Install Piwik
The first step must be to install Piwik on a web server. While installing Piwik, enable Ecommerce reporting.
Paste the javascript code onto your Joomla template just before the </body> tag.
Test that piwik is correctly recording your pages.
Installation and Configuration of the VM PIWIK system plugin
- Install the plugin in your website with the Joomla Extension Manager
- Select the menu Extensions>Plug-ins manager
- From the menu Select Type choose System to filter only system plugins
- Click on the link System - VM2 PIWIK
- Enable the plugin by selecting Enabled for the Status parameter
- In the Basic options
- Site id is your Piwik website ID
- Piwik URL is the URL of your Piwik website
- Order status confirmed order: you can select one or more order status for the tracked orders
- Order status cancelled order: you can select one or more order status to remove from analytics in case of refunding/deleting orders.
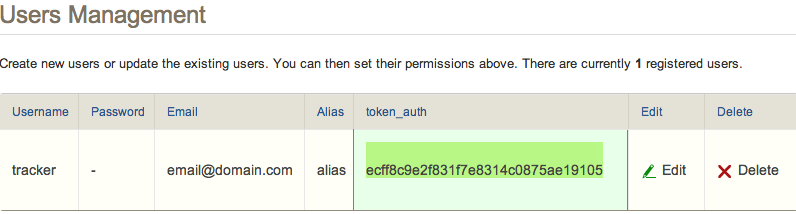
- Token_auth is used to record the order IP address of the confirmed or deleted orders. It is an optional parameter. If it is not set, the orders are still tracked, but the recorded IP address can be the one from the payment notification. If set, the recorder IP address is the one stored in the order, ie the client's IP address which is the exact user IP. Create a new user in your Piwik website, with admin rigths.